
Articles | LP Audio Nonsense Part 1
Ah, Motion Picture media. One would assume the focus of a video presentation is exclusively centered on the visuals. This was never truly the case - even in the era of silent movies, music was a critical band member in the presentation.
Today, I was met with a tough challenge in my Dark Souls 3 LP. The challenge was one I had been facing throughout my time with developing videos - audio, in fact.
Much like architects of vintage motion picture, I treat audio very seriously. While I was originally content to use my stock compressors and settings originally designed for VA when I first started my youtube releases, I had done so with the intent of providing balanced and malleable audio from out of the gate. Indeed, youtube promotes a kind of race to the bottom of the barrel for audio quality. No shortage of Unreal 4 or 3ds max videos are infested with buzzing, humming, crackling, and other sorts of easily resolved audio issues that render what may have been a valuable production entirely unwatchable. On the other side of the budget fence you have companies like Blizzard whom seem hellbent on making their videos sound like they're being played by a cellphone - destroying the low frequency ranges and smashing all of the audio into the upper ranges with equalizers and heavy-handed compression. Look no further than the Mists of Pandaria or Heroes of the Storm videos for examples on how to not process audio!
Unfortunately, the path I walk is not very distant from those tony and his many klansmen strode to produce those productions. Indeed, the Loudness War makes use of some very powerful and necessary tools when it comes to audio production. The first is the Compressor, and it is the Compressor I will talk about most today.
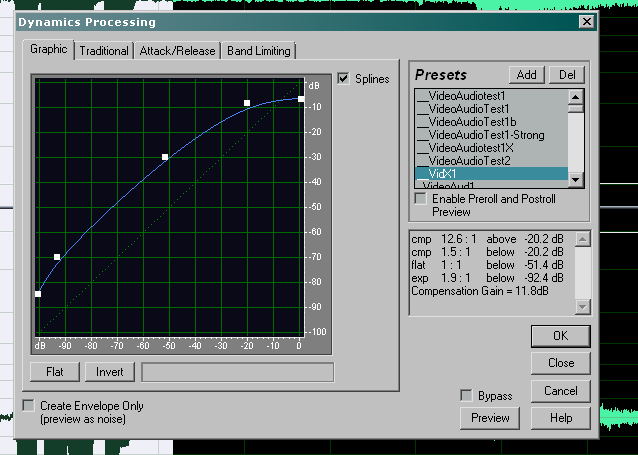
The stock Audition 1.5 compressor.
Not to be mistaken with file compression, a Compressor is a filter that modulates an audio sample's volumes according to some parameters, such as source volume and frequency. Superficially, a compressor is extraordinarily simple, but in practice it is incredibly powerful. In 99% of cases this power is misused, producing harsh, grating vocals like Kerrigan's, or slowly ramping background static between dialogue in old movies.
I use a compressor to keep my voice level between high and low points in my productions, be they VA or commentary for an LP. That's the superficial approach to it, and my end goal. Unfortunately, the process of reaching that goal is not a trivial one, and eight years since I began releasing public media I'm still trying to figure out the specifics of getting a good, reliable solution for my large projects.
The problems all start at the source - Fraps.
Fraps hands me a single audio stream containing both the game's audio, window's audio, and my own. Throughout the years I've tried to obtain a method that will hand me multiple audio streams - one devoted to each source - but there is, plainly put, no reliable solution. Productions like God of War, Vikings, and the original Dante's Inferno run all suffered from the plain simple truth of incompetence. From Audition deleting chunks of audio and deleting different things to Vegas allowing different audio streams to drift out of sync, to OBS injecting noise and flat out corrupting everything it touched, to programs silently stopping recording audio altogether, it seems that fraps' sole saving grace is its general reliability in capturing synced audio.
Unfortunately, it is mid 2017 and we're still trapped in an age where no one cares about quality or feature complete software, so Fraps still hasn't seen a meaningful update since inception. That means I'm trapped using the joined audio stream and trying to reach my end result - leveled out vocals with minimally distorted game audio - through a mire of undocumented and unsupported software.
Audition's compressor is my primary weapon in turning the totally unbalanced and unlistenable source audio I create with my recordings into release-worthy content. On the side I also use iZone Izotope 4 to reduce sibilants. Most of the work is done with this one filter, though.
Only two tabs are super important for the compressor - the Curve editor and the Attack/Release tab. The curve/traditional tabs are just different ways of expressing the same thing - how the filter is treating specific volume levels. The higher the curve is from its center position, the louder the volume. Left is lower source volume and right is higher source volume. Therefore, the curve shown above very clearly elevates all volumes except for higher levels, which it reduces and eventually hard caps. An extremely slight bump is given to the curve where the volume for my voice typically resides. With this in mind, I present to you the first part of the strategy I've developed over the years.
Balancing Voice & Game Audio
It really isn't surprising to discover that pretty much no LP'er knows how to balance audio except those I had some hand in teaching myself. Most video content producers don't even understand the visual aspects of their presentations; that the majority of them use low-quality services like Youtube or Twitch attests enough to that. Audio, however, is considerably more complicated and time consuming to get a grasp on than visuals for the new user. I had a lot of prior experience but it did little to prepare me for the challenges I would face.
The most basic problem with recording a game is your voice's volume. It is all too easy to be either too quiet or too loud. I set my microphone to record at a fairly high volume - Gain is preferable for this, if available, because it produces more consistent results. I then set my game audio to be a few steps lower than what I *think* is balanced during my initial tests. This is because my positioning and casting levels tend to vary heavily throughout gameplay, as does a game's volume. Games are typically not playtested much less given a Quality Assurance pass during development, so unbalanced audio is common in source material as well.
Were it only loud or quiet volumes individually, most stock compressor filters would be sufficient to give one decent results. However, many complications immediately crop up when dealing with different extremes mixed together. First of all, most filters are poorly programmed and produce static or other distortion when handed high-volume source. Since the source is also often clipped in such cases, they will end up making poor source sound even worse regardless of their configuration. Audition's stock compressor is thus far the only filter I've used that doesn't do that.
Since I record my game audio at a low volume, I need to elevate it - and my voice, when spoken lowly - to match the upper levels of volume in the waveform. See above - this is why the curve is set up the way it is. Furthermore, my voice tends to dominate game audio and the waveform during much of my more wordy or lively casting aka when I get angry, so that needs to be crushed. Hark, the curve's second purpose.
Were it only this simple, then this documentation wouldn't be necessary. The other tab I mentioned - the Attack/Release tab - adds a considerable amount of complication to the process. After all, the Filter has to know how and when to tackle spikes or dips in audio, and that's where this tab configures it to do so.
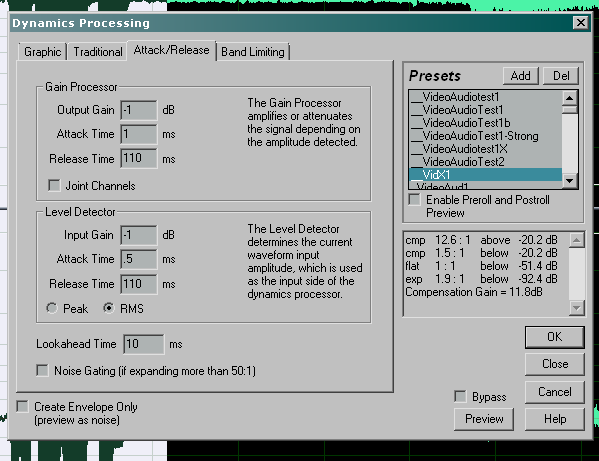
In Layman's terms, the filter is doing two things - processing volume for a sample before handing it to the Gain modifier, and then modifying the gain according to your curve. I think, anyways. Truth be told, I'm not 100% sure how this thing actually works - thus my effort to document it. The most important details are the timings.
Audio filters are not very smart, because they only have so much information to work with - the volume level, in terms of dB, and the Frequency range, which for this filter is very broadly generalized in the Band Limiting tab (izone's compressor is far more powerful in this regard, but produced very poor results when paired with my source material).
Since we're dealing with very diverse, mixed source, we need a one glove fits all solution. This is where problems can really start to crop up. The settings shown here are modified settings I developed in early 2016 and further modified during the Dark Souls 3 run. They work especially well with my voice, but struggle in busy walls of noise that often came into play during the title's boss battles. As a title with already very heavily processed audio, it handed me what were effectively worst-case scenarios - walls of sound that were already quite distorted.
Though it may not appear so, my compressor settings are extremely aggressive and far more powerful than what would be considered feesible applicable for most modern media of quality. What allows them to produce good results is an extremely specifically tailored recording environment, as aforementioned. During Dark Souls 3, however, I ran into the problem where the noisy background of boss fights and some specific other areas produced a growling distortion typical of heavy compression. To get deep into this problem and why this tab is super important, I'll take a step back and show you some visual representations of what the most important settings - the Attack timings - do.
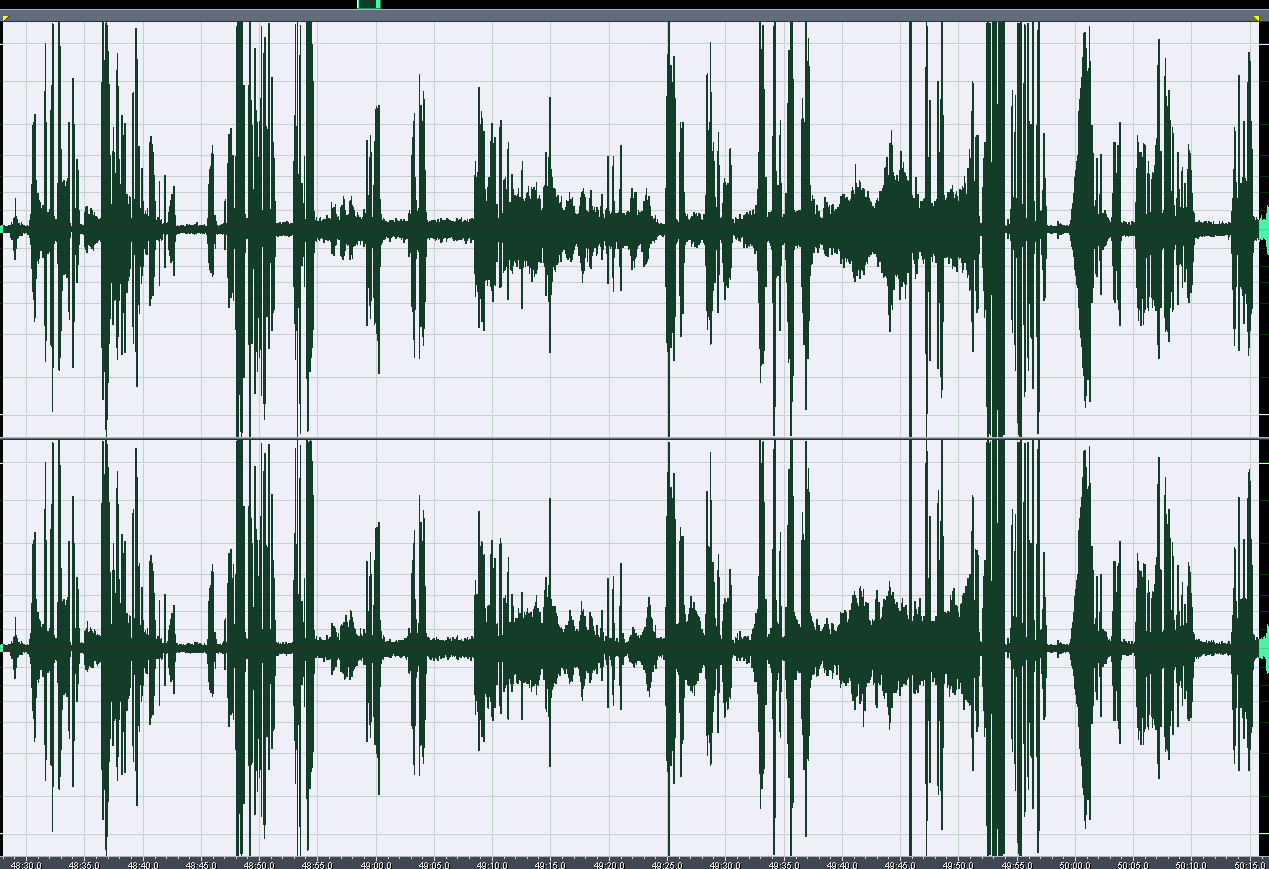
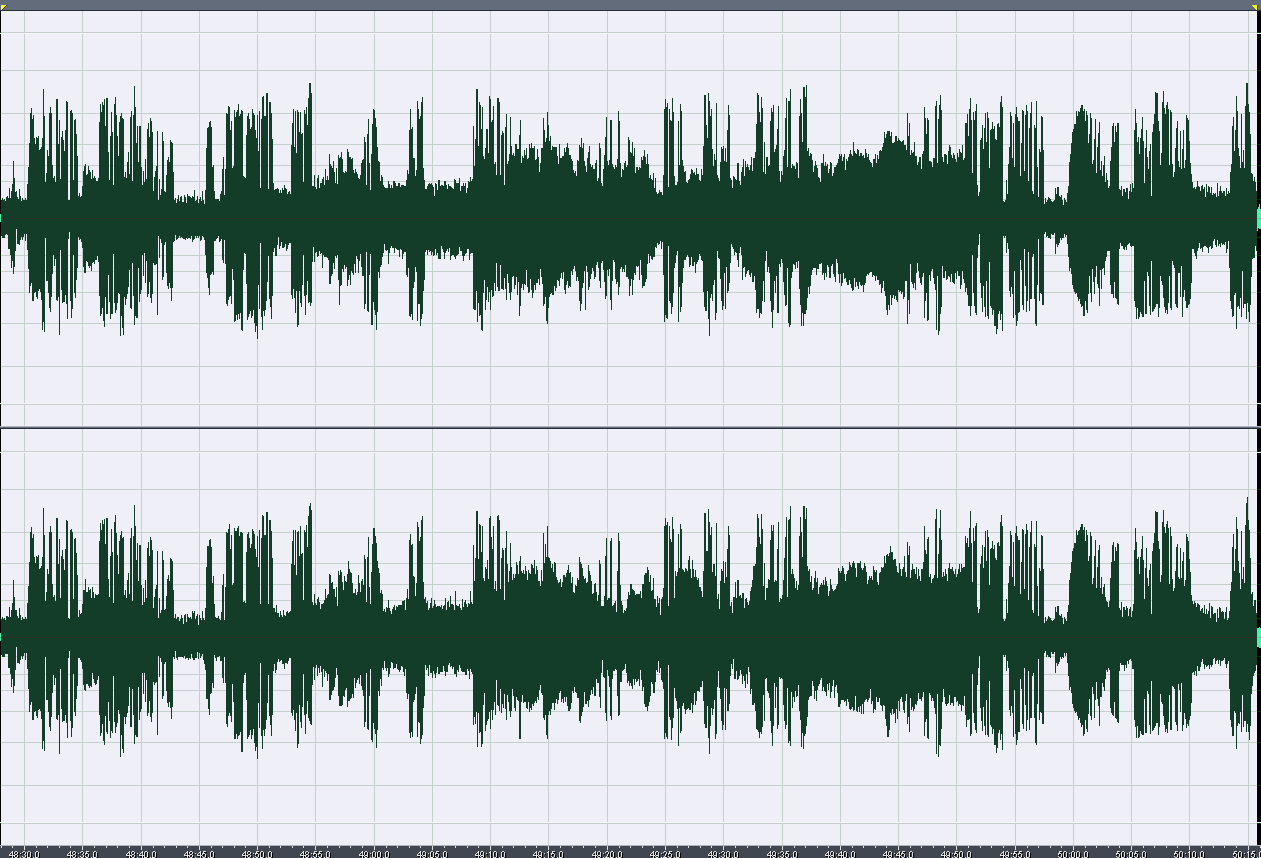
Source Audio
The source for Dark Souls 3 is typically favorable - very little in the way of background audio. As a result, I recorded at a slightly higher than normal volume for my runs. However, because of background fan noise I was forced to place my mic closer to my face. I also ended up very slightly raising the mic volume as part of my experiments with this game's audio. Although most of my voice is clipped only a few portions are noticeably distorted from it.
Vid1X 50ms
If I compress the audio with a 50ms timer on the Gain, you'll notice that many of the original spikes are still spiking - some quite heavily. This is because the compressor is taking 50ms to "see" those spikes. Short words, expressions, or sudden snaps of noise may be ignored entirely. This results in a "bouncy" effect, especially during speech.
However, this also means that longer strings of background audio will "warble" less, because the compressor won't be looking at them for major changes very often.
Admittedly, I am not entirely sure how the Attack and Release timers behave with one another, but the Release timer is effectively how long it takes for the results of the Attack to subside (or begin to subside). You'll notice this a lot in, again, older movies who use very strong compressors, especially with conversations that don't have background music.
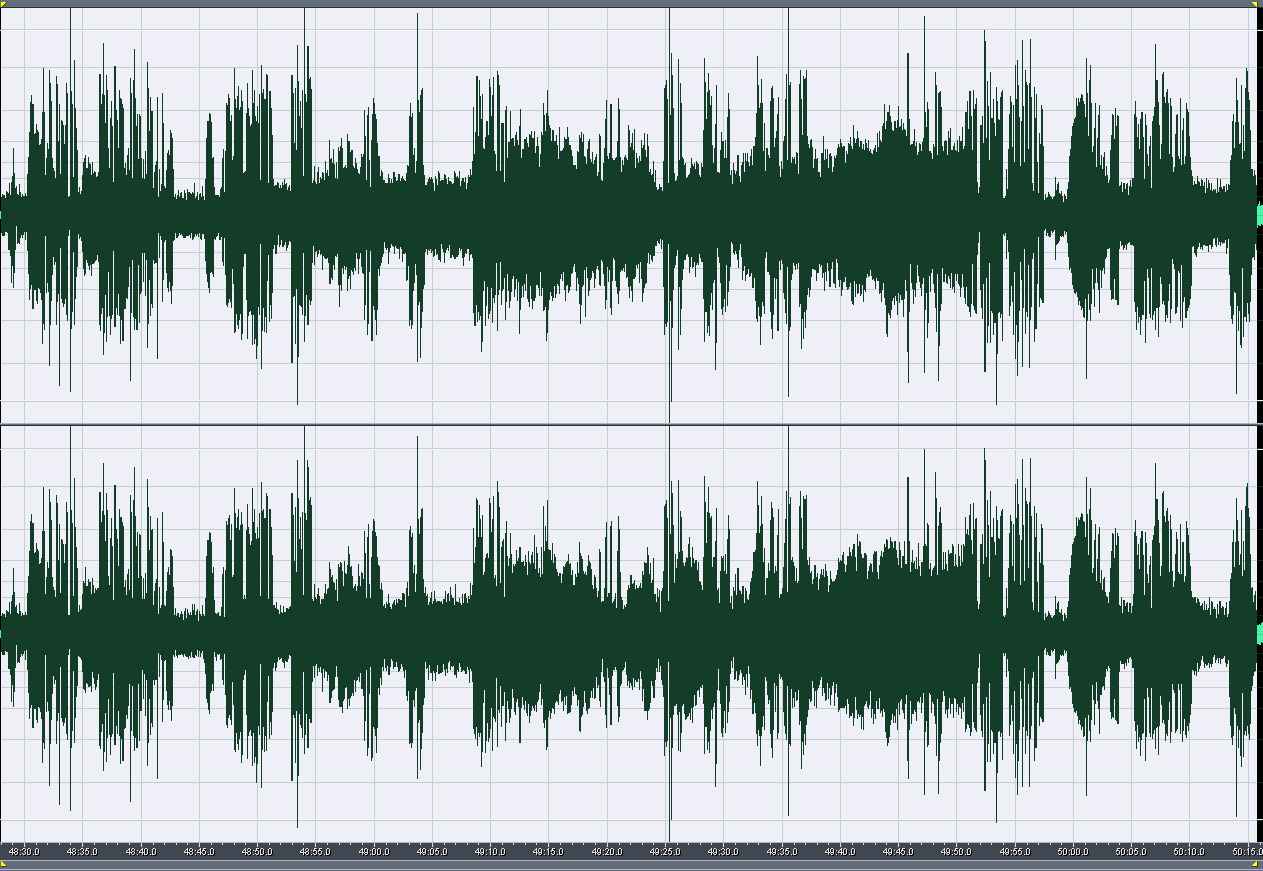
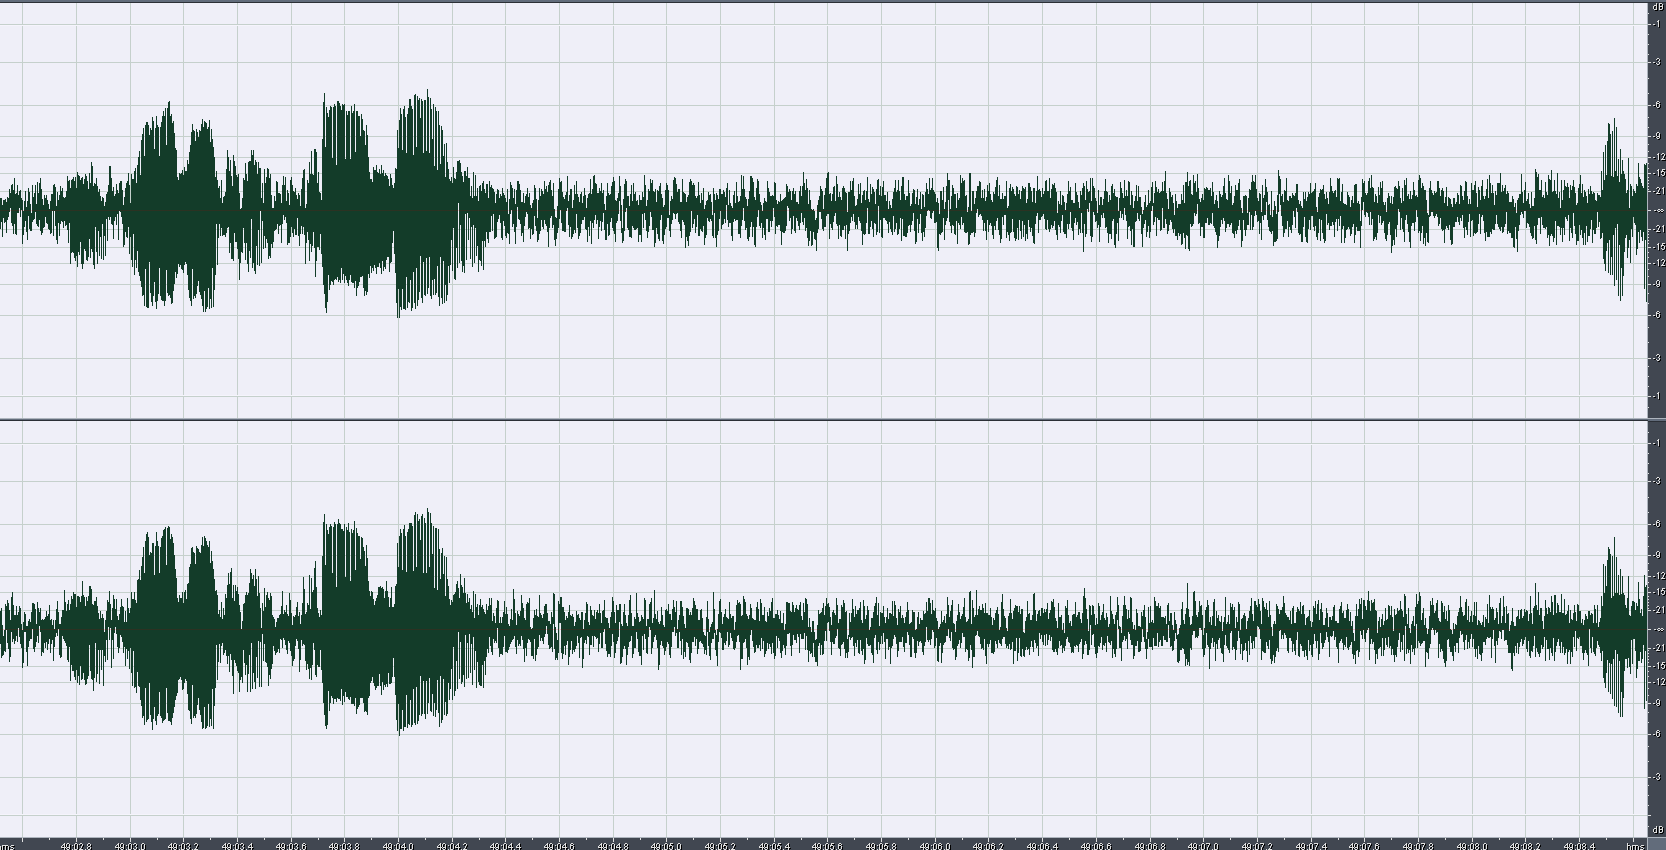
Vid1X 1ms
The exact same filter, but using 1ms for the attack. You'll notice the wave form is much cleaner and the spikes are mostly gone. This is basically perfect for my voice, but the edge cases I mentioned earlier occur the most with this setting.
When source is already distorted or loud, especially in a manner that provokes my curve's elevation e.g. a quiet but growly tone, the compressor will not only elevate the volume but attempt to normalize it. At 1ms, it's like using a fine sandpaper on a coarse sandpaper - you're going to get a conflicted end result.
Extremely rarely does this become an issue with music or sound effects unless the source is already distorted, because their volumes and waveform are usually "smooth" enough that they won't provoke sawtooth behavior from the 1ms Attack. However, samples that are already distorted, either from compression, high volume, or very low volume and being elevated by the compressor, or simply from being mixed amidst other samples, will produce uneven waveforms. When the conditions are right, you get noise that looks like this:
The end result can be that the 1ms attack is constantly fighting the waveform to reach its Gain specifications. To the end user, this can make the sound muddy or "dirty". To add more problems to this mix, this was recorded amidst fan noise that produces turbulence that the Compressor will invariably attempt to escalate because it's low volume. This was the root of my issues with the Yeti - said fan turbulence would produce a low growl that could cause ear strain when the compressor hit it. Thankfully, the AT2020 produces a far cleaner result amidst the fan noise, but not clean enough to avoid my very aggressive compression.
I can't weaken the compressor, because then the volume of the game and my lower speech will be lost amidst the louder portions of the audio. I can't increase the delay on the Attack, or it causes inconsistency in speech and spikes in volume all over the place.
Unfortunately, setting the level detector to Peak instead of RMS (Richard Matthew Stallman, most likely) doesn't produce the kind of results one would hope for. In fact, adding further delays to the Attack in this portion causes the resulting waveform to escalate in volume considerably. One might hope that the "Lookahead" can offset a high Attack on the gain, but it takes 50+ Attack to have positive results in the distortion, and the Lookahead caps at 30. Meddling with these settings produced promising but, unfortunately, only half-baked results.